By default resources, you launch on the cloud (EC2, RDS, and others) cannot communicate with your local networks like home or office. To allow this you can create a Site-to-Site VPN. This VPN connection will be established between your router and AWS VPC.
Creating VPN between networks is well documented. However, you can have issues configuring your home router. At home, I have a Unifi Dream Machine router, which is designed for small networks, but has features that match advanced routers for offices. One of them is a Site-to-Site VPN using the IPSec protocol.
Setup VPN on AWS ☁️
The first step is to create a VPN connection on AWS. For this blog I will use… the default VPC 🙂. To configure it AWS requires to define 3 components: Customer Gateway, Virtual Private Gateway and VPN connection.
The Customer Gateway is basically just an entity that holds the information about your home router - public IP. The Virtual Private Gateway is the virtual entity on the VPC side, that allows configuring routing to that gateway. That VPG is attached to the VPN. So the last entity is the VPN connection which brings it all together and establishes the VPN tunnels between your home or office and VPC.
Create base components 🏗️
To start your VPN connection start by defining Customer Gateway.
Go to the VPC tab, find the Customer Gateway panel and click the button to Create. The required field is IP address. Write here your public IP address where your router is running. Also, it is good to name this gateway. I named mine home.
To quickly check you public IP you can open https://ifconfig.co
The next step is to create a Virtual Private Gateway. Go to the Virtual Private Gateway panel and click Create. It just asks for a name. Let’s name it also home. The VPG state will be detached. I will come back to it later.

Create a VPN connection 🔒
This is the time to start defining VPN. Open the Site-to-Site VPN connection panel and click Create VPN Connection. The form will have 3 panels: details and tunnel options.
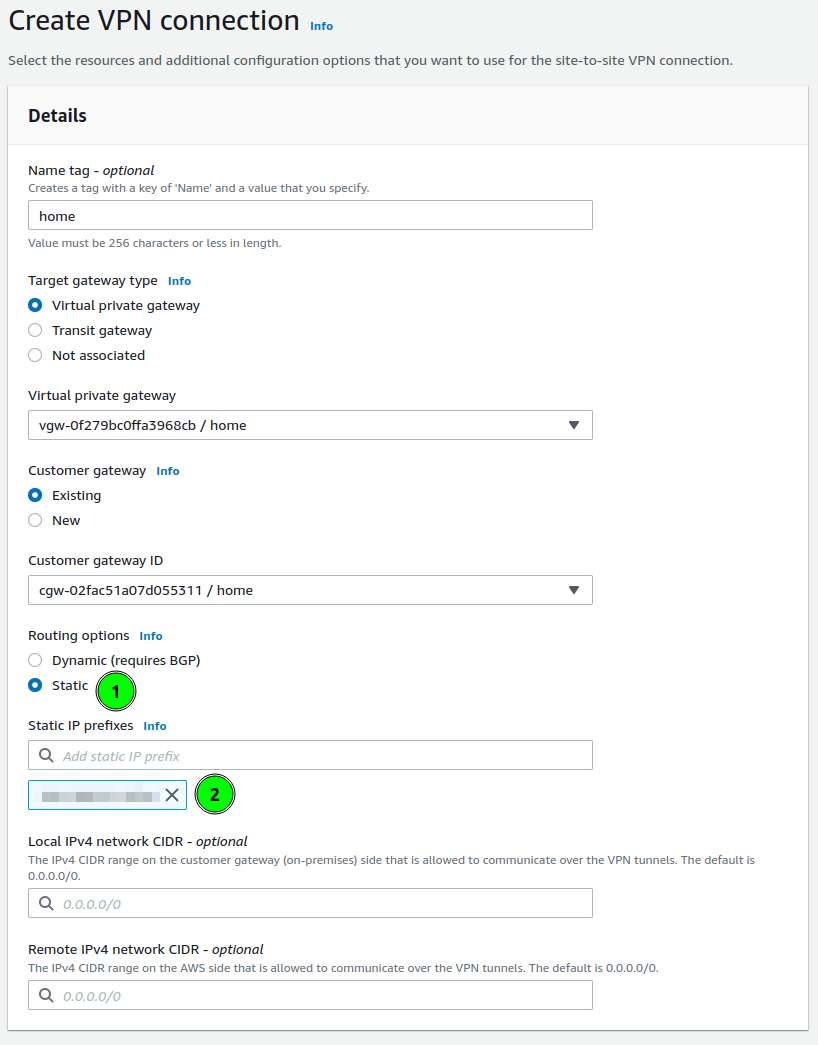
Details start from defining the gateway on the VPC side. Choose Virtual private gateway and in the form select your VPG.
Next select Customer gateway. Here you define with which router the VPN will be established.
There is the last configuration to set: routing. It is a section where you can define which local networks the VPN will be used for. On the screenshot, I marked this as a point 1.
AWS allows for two options: dynamic routing based on BGP, and statically defined. In my case, I am using static.
In the prefixes, I am putting my local network prefixes(like 192.168.1.0/24). You are allowed to put multiple networks here.
Configure Tunnel Options ⚙️
Tunnel options allow defining the IPSec parameters. AWS creates 2 tunnels, to which you can connect and each of them you can configure differently. Or the same 🙂.
What I am always choosing is:
- Encryption algorithms: AES-256 (for both phases)
- Integrity algorithms: SHA2-256, SHA2-384, SHA2-512
- DH groups: all above 14
- IKE Version: ikev2
Those parameters will be crucial for setting up our Unifi router.
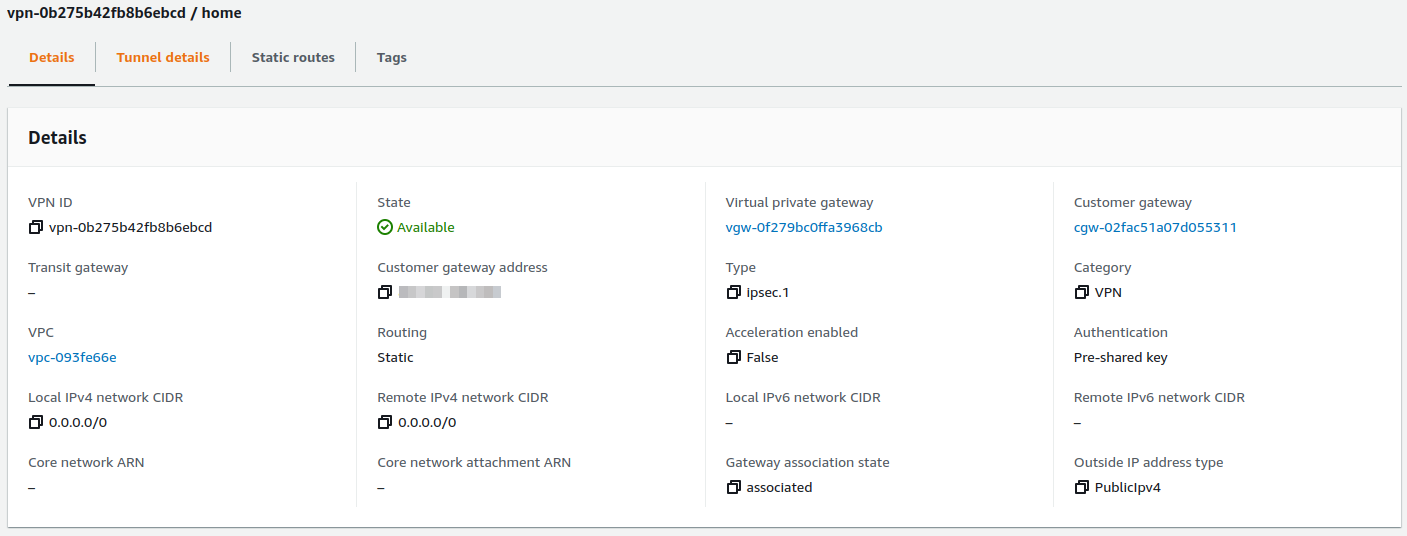
When you finish these changes you can create the VPN and wait a few seconds. The VPN connection should be ready.
Configure VPC Routing 🛣️
Previously I mentioned that the Virtual Private Gateway state is not attached to any VPC. We can reassign the VPN connection between VPCs by changing attachments.
To attach go back to Virtual Private Gateway and select your VPG and in Actions, button find Attach to VPC. Select your VPC and your VPG should be available to configure routing on VPC.

On VPC the last thing to configure is routes. As we have assigned VPG, and networks from our home are known (configured on VPN with static routes), we can configure automated propagation of those rules to VPC route tables. To configure this perform:
- Go to Route tables
- Select routes assigned to VPC, or those which should have access to your home.
- Select Actions button, and choose Edit route propagation,
- Select Virtual private gateway
After a few seconds, the new route should be added
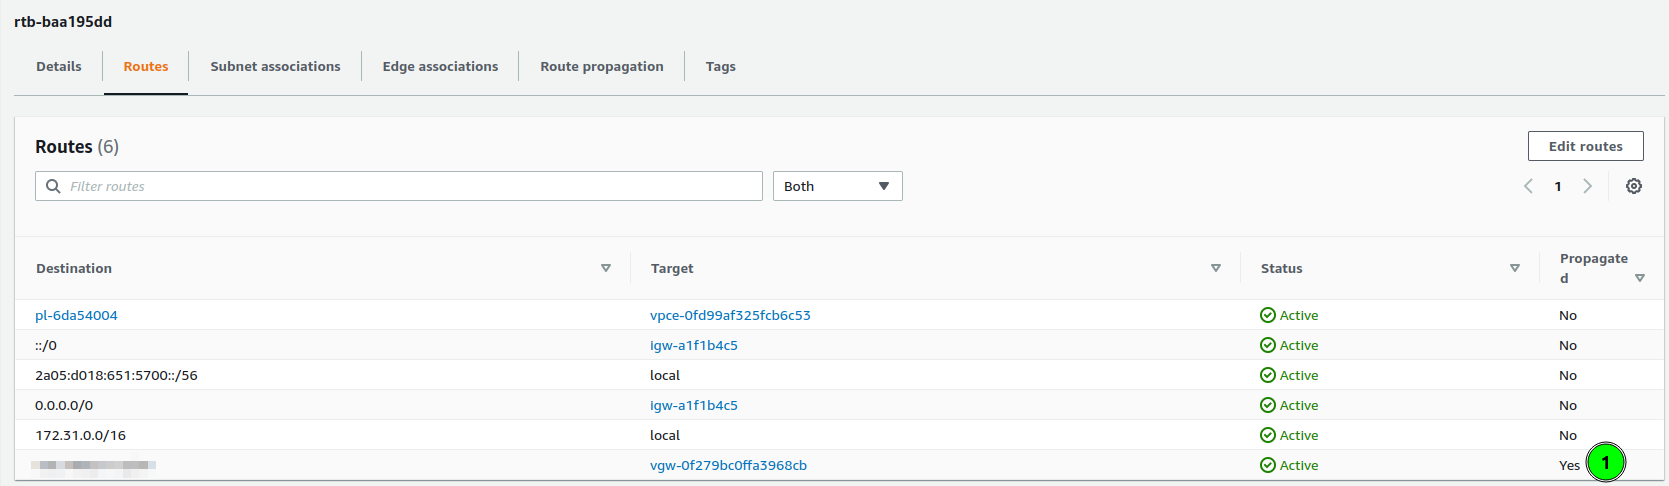 As you can see, the last route is “Propagated”, and its target is my virtual private gateway.
Setup VPN on Unifi 🏠
Having configured AWS VPC, the last part is to configure our router. In my home, I have Unifi Dream Machine, with the latest software (Network 7.1).
To create a VPN connection:
- Go to Settings > Teleport & VPN,
- Scroll down to Site-to-Site VPN and click Create,
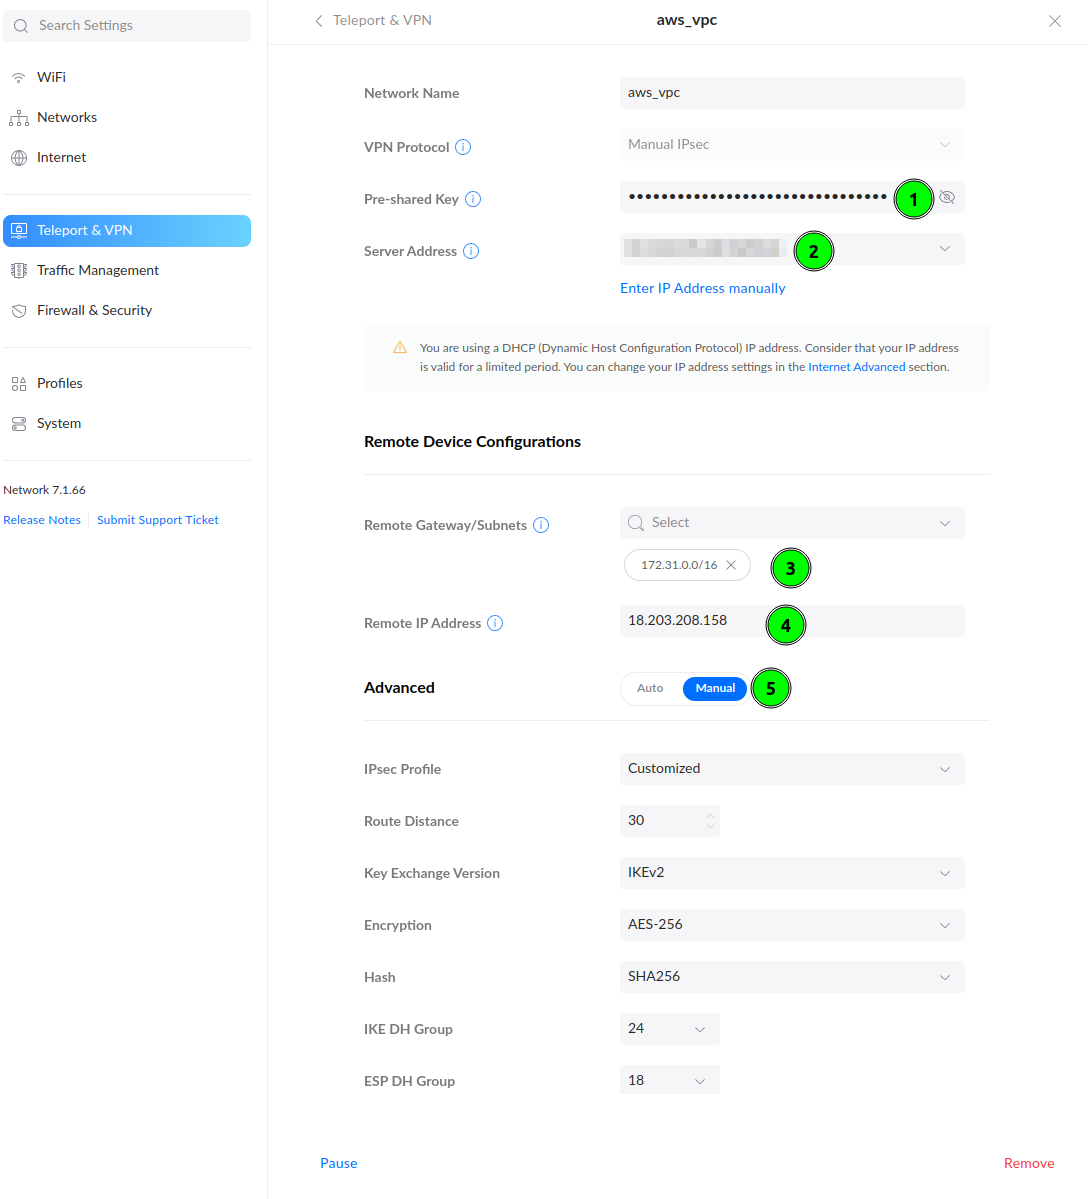
Start filling out the form. The Pre-Shared Key you could configure in Tunnel Options. If you have skipped this, go to the AWS VPN tab, and click Download Configuration. In this file you will find the PSK to fill in point 1 and the Remote IP Address (point 4).
In the Remote Gateway/Subnets(point 3) put AWS VPC network addressing. In my case, it was 172.31.0.0/16.
To align encryption options with Tunnel Options on AWS, select Manual in Advanced configuration and customize. Configure your parameters according to how you have configured them on AWS. I recommend using AES-256 and higher DH Groups and use the above image as an example.
Last step - testing 🪛
To check if you have a working VPN connection create an EC2 instance on this VPC.
I have created an instance with IP 172.31.34.95. This instance has a Security Group rule allowing for All Traffic from my home network.
When the VPN works and instance is up, a simple ping can prove that everything is configured:
$ ping 172.31.34.95 -c 5
PING 172.31.34.95 (172.31.34.95) 56(84) bytes of data.
64 bytes from 172.31.34.95: icmp_seq=1 ttl=63 time=38.1 ms
64 bytes from 172.31.34.95: icmp_seq=2 ttl=63 time=38.2 ms
64 bytes from 172.31.34.95: icmp_seq=3 ttl=63 time=36.4 ms
64 bytes from 172.31.34.95: icmp_seq=4 ttl=63 time=38.3 ms
64 bytes from 172.31.34.95: icmp_seq=5 ttl=63 time=38.1 ms

--- 172.31.34.95 ping statistics ---
5 packets transmitted, 5 received, 0% packet loss, time 4005ms
rtt min/avg/max/mdev = 36.380/37.810/38.285/0.718 ms
If you are not sure that you are pinging EC2 take a look on ping response times. On local networks they are much lower.
Summary ☑️
Setting up VPN allows making your infrastructure secure. You don’t have to expose ports on the public internet to have access to cloud machines.
FAQ ❓
I have two network VLANs at home, should I configure some firewall rules if I don’t want to allow access from one of them?
Let’s assume you have two networks: home and guest. If the guest network should not have access to resources to VPN, on AWS VPN, in Static IP Prefixes configuration you have to set only home network subnet.
Another thing are Security Groups, where we define allowed networks. If you will not set too wide network range, then it will also block access.
]]>